7.28.2010

thrift shop inspiration venture


so after getting all of my video gaming out, i took a trip around the thrift shops in town, and found some wonderful things! this is one of the best trips i've had. everything in the picture, altogether, cost $4.95! so happy.

the little clowns are going to be used in a circus themed assemblage i am working on, and the little grandfather clock is being used in another assemblage. so i have about 3 different projects going on at the same time for now. i was going to use the silver pins in a nautical themed work, but i love them so much i think i'll just wear them on my jacket. :)
i was going to use the tins for bridesmaid gifts, but i have a different idea for that now, so i just have spare tins!

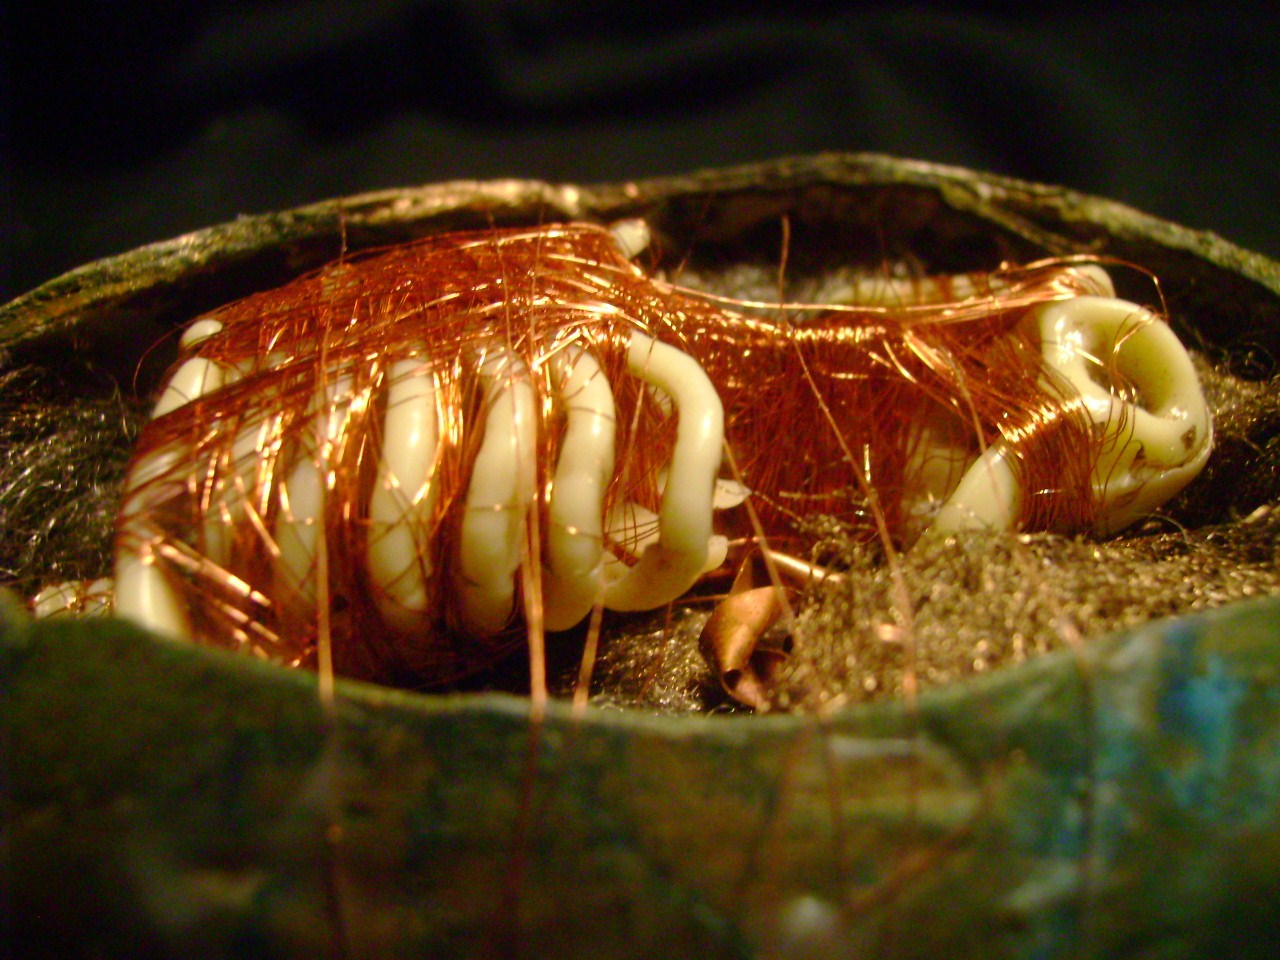
one of the best little surprises was when i opened up the clock face and found all of these awesome miniature treasures! they are super tiny, but gorgeous little cogs and gears that i want to use in some sort of mini-assemblage.

7.27.2010

what i love this week....

bird/nest themed art. the one above can be found at Studio B along with a plethora of other bird related art.
i had started on this piece before i saw the three muses theme this week: odd birds. so i may go back and make something for that too, since i am feeling birdy as well.
the whole piece is made from a jar lid, spray painted gold. then i used some robin's egg blue and gold wallpaper on the inside with a silhouette of a bird on top. then i added some blue and white lace around the edge, and i love the effect! it made it feel very homey and domestic, kind of like my altered tin about womanly duties.
then i added the feather and beads to the bottom, which gave it kind of a dream catcher feel. so i went with that and added the blue thread with beads to the surface and some buttons on the inside to play on the domestic theme.overall i feel that i created something that is very cohesive and brings together a lot of different themes; a domestic theme, which relates to the feeling of being trapped in a role, which goes to birds and freedom which is echoed by the net created by the dream catcher threads. so i was very surprised when i got to the end and found how well everything fit together. in my studio classes, my professors are always pushing us to tie things in a relate things, so i think they would be very proud of this. :)

***UPDATE***
i had wanted to add a small egg to this, but all of mine where too big. then i got lucky and found a real egg that was the perfect size and color! unfortunately, i found it an hour away from my house while visiting family, and it did not survive the ride home. but i used the pieces any way and this is how it looks now!
i kind of like it broken, it goes with my "freedom and breaking out" theme. so i'm happy with it, and i am currently working on another dream catcher-esque piece, steampunk themed. :)

7.13.2010

a wonderful find!

we had a nice day off to browse thrift shops and do some shopping. in a little video game/music shop, Media Rerun, we found these! they are guitars and basses made from found objects like cans, cigar boxes, license plates and first aide boxes. and they still have a nice sound.


such a wonderful find, i thought i should share. :)

what i love this week....

egg art! the first time i saw this was in Altered Curiosities while i was flipping through it at a bookstore. didn't buy it, wish i had. this project is inspired by Carla Trujillo's egg shrine, pictured above.

i started with a paper mache egg i found at Hobby Lobby. then i filled it with a soft steel wool pad to give the inside some texture and also to build a solid background on which to work. then i added some miscellaneous clock parts and other little metal pieces intertwined with the wool.
i loved the effect of wrapping the copper wire i used in my altered clock piece, so i used it again in this piece, but with much more wrapping. i liked how the skeleton really took on some skin and muscle form as i wrapped the wire.
last, i used the same wire to bind it all together, which is my favorite part of the piece. in the picture, it is mounted on a small bottle to hold it up.


i'm not sure what i'll do with this; find a way to mount it as is, or work it into another bigger piece. i really see this as a work in progress still. i want to incorporate this into my time/death theme, i hope to eventually have enough pieces of quality and variety to make a show of it. but we'll see how that goes. for now it's all for fun.

7.11.2010

a little love

i don't do many love pieces, but i kind of felt like it today, so here is a love piece!
it is on a small 5"x7" canvas that i got in a three pack from dollar tree (love!). i started with a cardboard heart that i glued to the center of the canvas. then i glued sheet music over the top and burnished it to fit over the heart. then i used red, green and black oil pastels to add color to the whole piece.

next i got a little creative. i wanted to use some Tim Holtz sprockets, but i only have 2 left and zero money. growing up poor has forced me to find ways around no materials and no money. what i did have was a spare sheet of rubber stamp material. so i traced my last sprockets, cut them out and stuck them to paper clips for some makeshift stamps. i really like them! ha.

so i used these stamps and some swirly stamps to build up some nice layers around the edge and alphabet stamps on the top and bottom. then i used silver crayon on the green and gold on the red for some more swirls.

finally, i added the key and screw. i just used a regular screwdriver and stuck it through the canvas and everything. and the last thing i added was the text, "love", cut from a magazine.

7.08.2010

three muses challenge: rust

this is my entry for the three muses challenge: rust. rust has always been one of my favorite elements to use in art, so i'm always collecting rusty things. this piece was a door i found in the bathroom stall at school. it was covering some kind of pipes, but it had fallen off, so i took it!

i started with a gel medium image transfer of a phrenology diagram. then i cut out some sprocket silhouettes and added one real sprocket and some washers. the shiny rock on the right is set in a hole that was in the metal and has a nut around it. then i used some alphabet and number stamps along the top and some diamond stamps along the side. last, i added the mesh and drew on the circles.

i love that i didn't have to do any work on the background because it was already perfect! i was also very happy with the image transfer. i found out that you could use gel medium the same way you use encaustic medium, and that opened so many crafting options for me. and i love the number stamps. i bought them a while back for really cheap and forgot i had them, this is the first time i've used them and i love them! i was really surprised at how well they stamped on the rusted surface.

altered clock

this is another piece in my time/death theme. i have been working on this on and off for about a year, and this is where it is for now. i think i may rework certain parts of it, but i do like some elements of it.
i used clock parts and bolts and nuts along with a plastic skeleton for the main components of the piece and set it in an old clock. first i made a simple paper bag clock face. then i mounted a few nuts and bolts to try to get a feel for what i was doing. originally i was just going to set the skeleton in the center, then i wanted to fuse it with the other elements. so i used some copper wire that i found in the clock when i took it apart and wrapped up the skeleton with some clock parts stuck inside. finally i fused all the elements together with the copper wire.
and this is the result!

i absolutely love the effect of the wrapping. i experimented with wrapping things in assemblage 64 and i will definitely be using it more. my sculpture teacher was always yelling at me to use some kind of wrapping in my pieces, but i thought it was a lame idea. now i wish i would have listened, because it is neat, and i would have made a better grade. :/

7.05.2010

what i love this week....


dominoes! the ones above can be found at Calamity Kim: Altered Art. i started using this medium about 3 years ago. these were the things that first introduced me to altered art. i loved the idea of using anything for canvas, and dominoes were what i first experimented with. my old blog had a project i did with altered dominoes, using them as covers for a small accordion book.

i also love seeing them used for jewelry, though i haven't been able to do that myself, i don't have anything to use to make holes in them. :(
however, i have used them to make magnets and i am very pleased with the results. this pink and green one was my first attempt. i love the colors and was very surprised at how well the scrapbook flower and button went together. i added a magnet strip to the back and a small piece of ribbon with a bead to the bottom.

7.01.2010

inspired by sewing...


and other womanly tasks. this altered tin uses the theme of womanly duties in society.
i found these wonderful women in a national geographic magazine with the caption "now look pleasant, that is all." i used a green, pink and gold color theme because i actually started thinking this was going to be a fairy tale tin. instead it turned into this after i added the women. i love the layers in this, especially the lace. my little spool was black and bare, so i added some green shiny yarn and colored it gold to fit the color scheme better. i also love the ribbon and beads on the bottom, i think it utilizes all of the tin and makes it an interesting piece.
this was a slow moving piece because of all the drying time. i had to work on everything a little at a time instead of my usual multitasking way.

but it was finally finished and i am satisfied with it. i'm not sure how to display it though. the beads keep it from being able to stand up, so i guess i'll find a way to hang it.

altered spoon necklace

altered spoons were one of the first things i found when i started getting into altered art. i loved the thought of using cutlery as a canvas, but i didn't know what to do with them when they were done. until now! this spoon is my first finished altered cutlery project that i made into a necklace pendant.

basically, i bent the spoon to a good size and painted it gold, blue and green. i used paint remover in places to give the finish a worn vintage feel. then i went through a billion ideas about what to put in the center. i started with a picture of a 1920s woman, didn't like it. so then i tried various clock parts and steampunk pieces assembled in the middle, didn't like it. finally i decided to use a dragonfly picture with a button and a ribbon. simple, right?

then i added the pearls around the edge, a green ribbon to the neck?, and made a pearl rope to hang it on. which absolutely took forever. but it was worth it. finally, i filled the spoon with a media mixer and let it dry. now the surface is smooth and hard. i'm really happy with how this piece turned out and i love the classic vintage feel it has, so elegant.

Browse Works by Theme